Intro
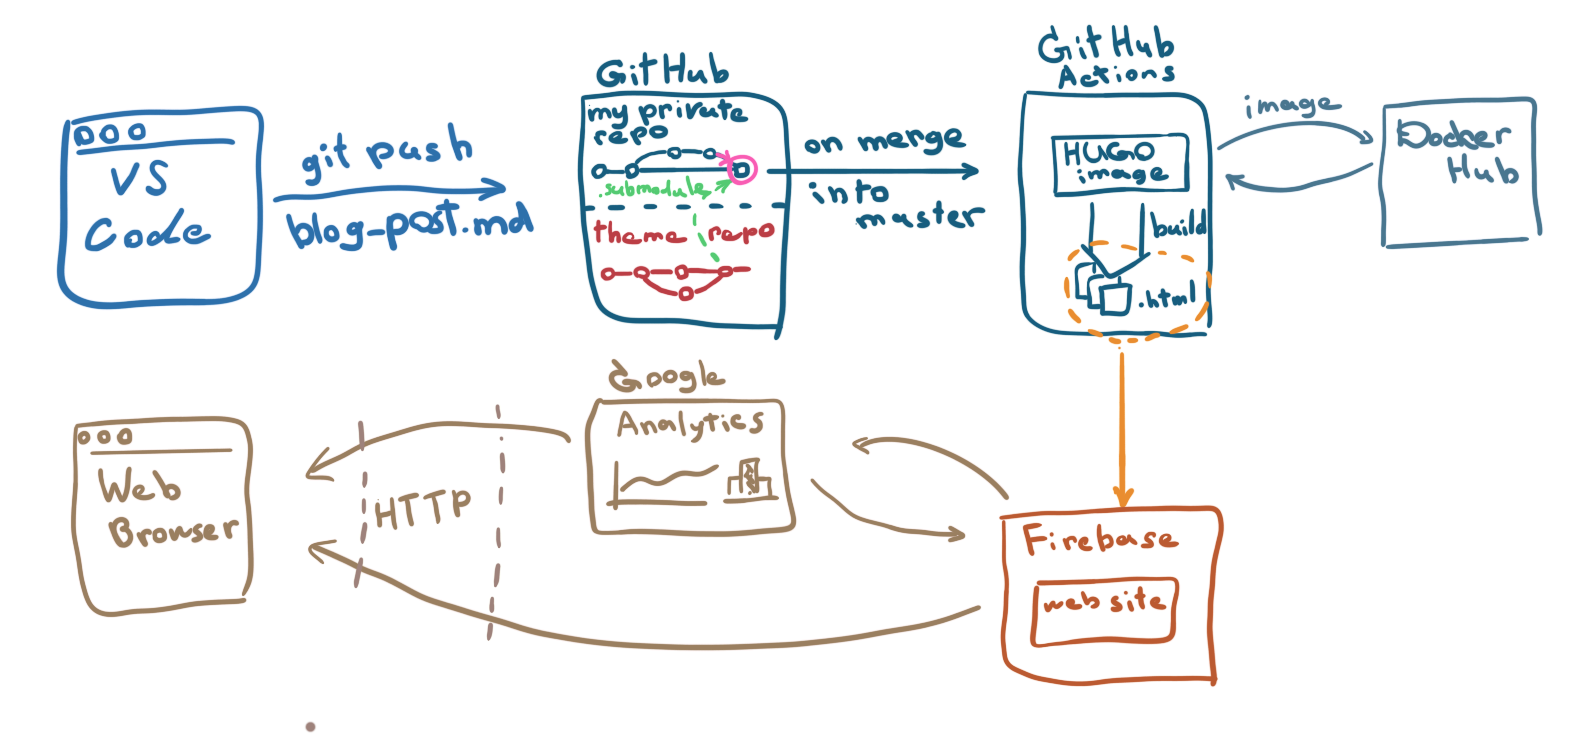
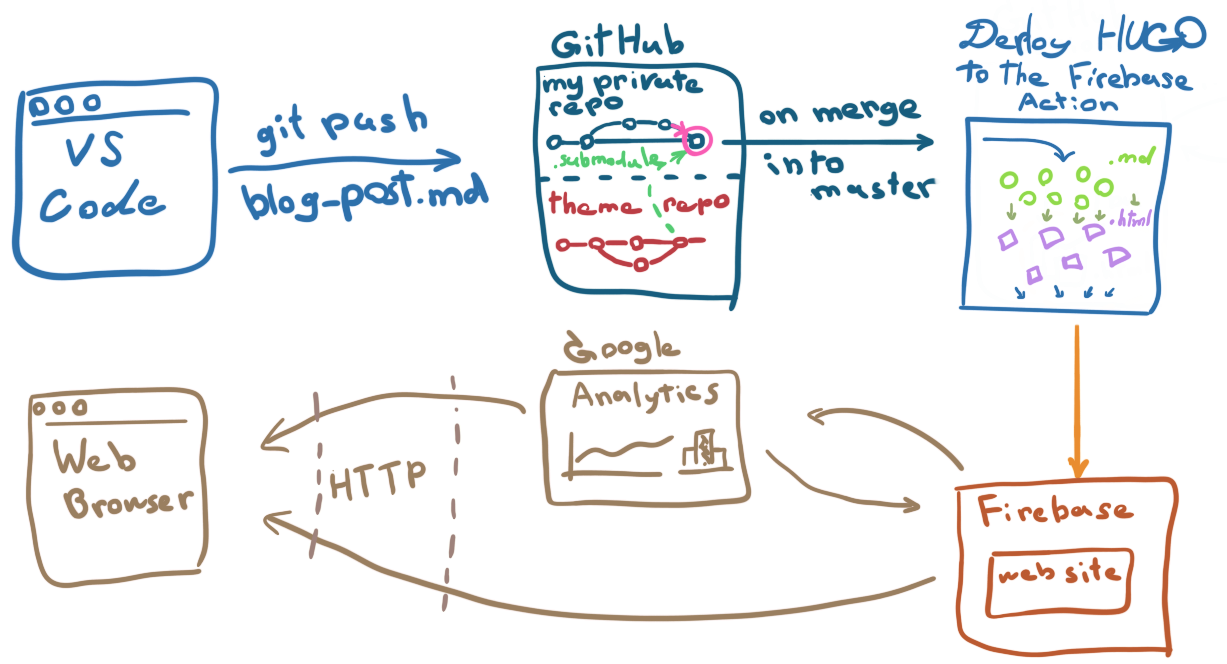
I wrote this article in the Visual Studio Code. It was a markdown .md file in the separate article-dedicated GitHub branch, which eventually became a Pull Request. And if you are reading it, it means that the post made its way to the master branch. The merge event triggered the process that transformed .md file into a static .html file, which was finally pushed to a hosting. And now you can read it.
This article will walk you through from the point where I started to the point where I ended up and which tools I used to get there. 🔧
It took me a while to start…
It has been a while since my first attempt to write a tech article. It seems like I always had ideas that I wanted to share or some topics I was interested in but didn’t have enough motivation to get my feet wet with it just for the sake of doing it. So I knew that material was not a problem… I wasn’t sure where to write it.
 I did a several attempts through the years, but usually after a week of looking into different blogging tools my motivation kinda dropped and I just abandoned the idea. To be honest it happened multiple times. Once I even started building my own
 logging library blogging platform. So the next time I decided to write something again I’ve made sure I spend no more than 10 minutes on platform investigation. At that time I’ve been actively using Medium as a reader and I decided to give it a shot as a writer. 📝
It took me a while to get here…
Although it worked really well and I loved the experience Medium delivers, the platform itself has quite a few restrictions related to discoverability and shareability of the content as well as who and when can access it. Moreover you are <paranoia> not in control of your information </ paranoia>. Let’s say Medium financing is cut and it has not enough recourses and eventually goes down, you are busted.😬
 So I thought of registering and moving to my own domain. This at least will allow me to do whatever I want with my blog and my posts. I didn’t want to build a website from scratch, so I figured I’ll quickly look for something to help me. The first thing that came up in my google search was a WordPress, which I ended up using for the next 6-8 months. Even though it did a job, it was a bit bulky and sort of a swiss army knife, while I needed only a toothpick. To be fair, I knew that I’ll eventually resume my search for a better option.
It was an almost seamless start, you can import your articles from Medium, register domain, choose theme all on the same page. It has an alright editor and you can even see some stats. 📈
First bell 🔔 rang when I wanted to do some minor styling changes here and there. It appeared to be not that trivial, it was somewhat customizable out of the box, but if you need something like custom code renderer for articles or even move icons a bit higher, you hit the wall. Second bell 🔔 was editor update. They did some changes to the editor and all of the sudden layout changed, some controls started to act oddly. The worst thing is that editor became pretty buggy and not completely backward compatible. When I was opening any old article in a new editor, the layout would change, even though I did not do any changes.😫 I’m not gonna stop on all the things, but given I paid for it, the experience I got did not match my expectations.
Furthermore, I still didn’t own my data. It is stored somewhere nowhere in the mysterious format. 👽 How much of a challenge would it be let’s say move it anywhere else? And the more posts I wrote, the less satisfying my experience was. The debt was growing.😨
Finally
I was postponing the move as far as I could until I bumped into a tweet 🐦 from Monica Lent.
Hey y'all! If you didn't catch it last week, I'm starting a free newsletter to teach devs about blogging, SEO, and writing content.
— Monica Lent (@monicalent) May 15, 2020
The 7-day kick-off challenge starts THIS WEEKEND, so join in if you're looking for a kick in the keister 😁 Happy Friday! https://t.co/PNlwM428R4
This is an awesome free course predominately aiming at new-starters (which I consider myself). It doesn’t give you any tools but exposes some underwater rocks, sort of a framework to start. I’d highly recommend it to anyone who is actively writing or thinking to start. I used it to improve my technics and get a few SEO insides.
Pick your blogging tech stack (It really doesn’t matter, I’ve used Hugo and Gatsby and both are fine. No shame at ALL if you want to use WordPress, either. The less you tinker with the tech stack, the more you focus on writing!)
– Monica Lent
Even though she says there is no shame at all (and it is true) I felt guilty and a bit ashamed and decided to finally tackle my blogging setup and make sure I like it.
I already tried a few things and I thought I’m ready to address all the pain-points and shape some requirements. I dedicated some time to put the list of requirements together and do some research. Here is the list:
- I want my posts in some common generic easy-to-read format
- Each post should be in a separate file
- I want to store them locally
- But have the ability to easily push them in the private cloud storage
- Same goes for images I use in posts
- I want to have a solid & fast editor, preferably not web-based and multi-platform with a live-view (see changes and how the post looks like immediately)
- I want to be able to sketch, draft and manage my notes easily
- Obviously, I want to have a seamless process of publishing new blog posts
- The whole thing should be fairly priced 💸
- Easily extendable, preferably easy to hook in some custom HTML
- The less JavaScript the better
- Multi-device, inclusive UX
- Avoid CSS as much as I can
Checklist ✅
I started the research, and here’s what I ended up with
That might look complicated at first, but in reality, it is just putting well-known existing tools in a single pipeline. It is a one-time task, moreover, some of the blocks will be eliminated and simplified further down. So bare with me here 😉
If you are not particularly familiar with one or another tool/service that’s alright as I’ll be giving just-enough details for anyone to grasp the “Why?” and “How?”.
Website
The last thing I wanted to do is to write articles in pure HTML and mess around with CSS. Although I wanted to have the ability to plug some random HTML every now and then.
Through the years I wrote quite a bit of Good Code Bad Code GitHub Readme files. I found GitHub markdown a very powerful and convenient way to format documents and got used to it. Nowadays it is an almost international way of structuring tech documentation.
I really enjoy how GitHub interprets .md files and wraps it with proper HTML and styling. I thought that it would be super neat to have something like GitHub Pages to render my .md files into something nice. I was even looking into hosting the website there at some point. Or creating a GitHub Repo which would consist only from .md files and treat it as a blog.
 Apparently for quite some time now there are dedicated tools for that matter. Static web site generators. Here are the most famous:
 WordPress, Jekyll, HUGO, Gatsby. I’m not going to compare them, as I’m sure you’ll easily find tones of great blog posts on this topic. All of them do exactly what I needed (produce .html out of .md). However I picked HUGO as it looked less opinionated than others, it is the fastest one and written in GoLang (I heart it is cool and fast). 😎
There are a huge amount of articles, how to set it up and configure, how to use it, how you can make aggregated/list pages, etc. It comes with its own CLI (command-line interface), a small program that you can use in the terminal of your choice to do some stuff locally. Another thing to mention, HUGO comes with a vast variety of themes. And switching from one to another is just a matter of downloading it and changing config.
Editor
 As I said I did quite a bit of
 .md files, hence I had everything sorted even before I knew I’ll do it the way I did. Probably no surprises here, I use VS Code as an editor. Out of the box VS Code supports markdown preview and highlighting, but there are thousands of add-ons that will enhance your experience. Moreover there are quite a few nice applications that were developed specifically for working with this document format.
I like using HUGO local server to see how my changes look. By simply running hugo server in my terminal and opening localhost:1313 in the browser window I can see how my article would look like on the website. It supports dynamic updates, so I see all the changes in the browser window as I type them in the VS Code.
Storage
My website now is a bunch of .md and config files, plus some images distributed across a couple of directories. The choice of storage was pretty obvious. With no further ado, I just pushed my website to the GitHub. GitHub allows us to have free private repositories, so I just created one for my web-site and pushed it there.
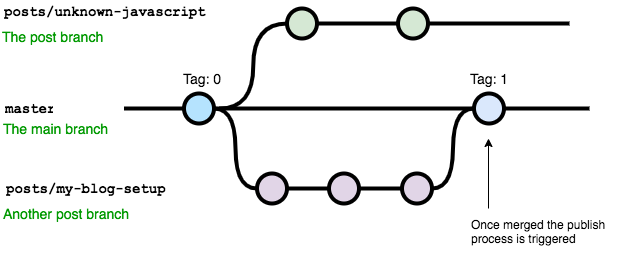
I’ve organized my writing process like so. master is 1 to 1 what is currently shown in live (website on the internet). Each article represented by a separate branch, and for it to go live it needs to go through the Pull Request process. Any merge into master will result in the immediate live website update (I’ll talk to it later).
To get the proper theme up to date I’ve added it as a .submodule. So whenever fresh update arrives, I just need to update submodule, merge it into master and I’m done 😎
Hosting
I was initially looking into AWS, Azure or GitHub Pages as a static web site hosting providers. All of them will do the job for a reasonable price, fairly easy configurable and provide a nice CLI, but I found that Google Firebase is cheaper, it is actually 💰 free 💰 if your website fits under certain thresholds (mine does 😜).
Analytics
It is important to keep track of what is happening to your articles. Depending on the feedback I can choose what to write about next or even how to write about it. It is hard to predict what will go well and what not without any statistics. Sometimes articles that I expect less show the best results.
Unfortunately, active feedback doesn’t show the real traction for me. By active feedback, I mean likes, re-posts, comments, etc. It useless, unless you get thousands of re-posts and likes from people you don’t know.
 Passive feedback is much more valuable for analysis. Passive feedback is gathered by collecting anonymous information about what is happening on the page after opening. E.g. I can see the country where the post was read from or time spent reading (I can distinguish reading time vs page just hanging in the opened tabs) etc. Based on this information I can make different strong conclusions, e.g if quite some people open the article, but don’t spend much time reading it, that might mean that the topic is interesting, but content does not fit the expectation, and next time I need to look for a better way to present information, etc.
So watch out, cuz I see what you are doing here 👀 😝
Anyway, I needed something to gather passive feedback, luckily there’s a Google Analytics, and as you can imagine it works smoothly with Google Firebase. So in a single click, I connected two dots and got a very detailed analytical tool to study passive feedback.
Glue things together or CI/CD blog posts
So far so good, but there’s a missing part between the Storage (GitHub Repo with .md files) and Hosting (Google Firebase).
I use GitHub Actions as an automation tool for the majority of my pet or outsource projects. So I thought why not try it here?
Long story short, I’ve put together a GitHub Action Deploy Hugo to the Firebase, so if you have a similar setup, you can easily add it and magic will happen. 🐰
After configuring the action (example given in the action details), it will use latest available Docker image with pre-installed HUGO, pull the data (.md files) from the configured branch (master in my case), build it (.md => 💥 => .html) and finally, push it to the Firebase.
End Pipeline
It took me a while to get to a comfortable spot. But I’m glad I didn’t try to find it from the start. Actually, I did, but I realized that more important to start writing first.
The end pipeline satisfies all the established requirements and provides a reliable and seamless way of managing a website/blog. All the parts are easily replaceable, so if you want to do anything differently or you think you might want to do something different in the future it would be a no-brainer.
Hope you find it interesting and maybe even use it as a base for your own setup.
Cheers 👋